Dell PowerEdge C6100 SATA Cable Part Numbers
I had a hard time finding these so I figured it was worth posting them somewhere so others wouldn’t have to search for as long as I did.
- HJ6F0 – 4 sata + SGPIO (sff-8485) => mini sas (sff-8087)
- HYJ6G – 4 sata + SGPIO => mini sas + SGPIO + 2 sata + SGPIO
- 334VV – 2 SATA + SGPIO => mini sas
- 6J3R2 – 6 sata cables
- DV4VY – 3 sata cables
- 3T15J – 3 sata + SGPIO => mini sas
Now why do I care about these cryptic and difficult to find part numbers? I recently purchased a Dell PowerEdge C6100 server with the goal of consolidating my back-end storage and front-facing webservers into a single 2U box. This required retooling which of the 4 units all the hard drives were connected to. The default configuration is to connect three SATA drives per unit, I want to connect six to each of the top two units and will use some more localized storage for the other two.
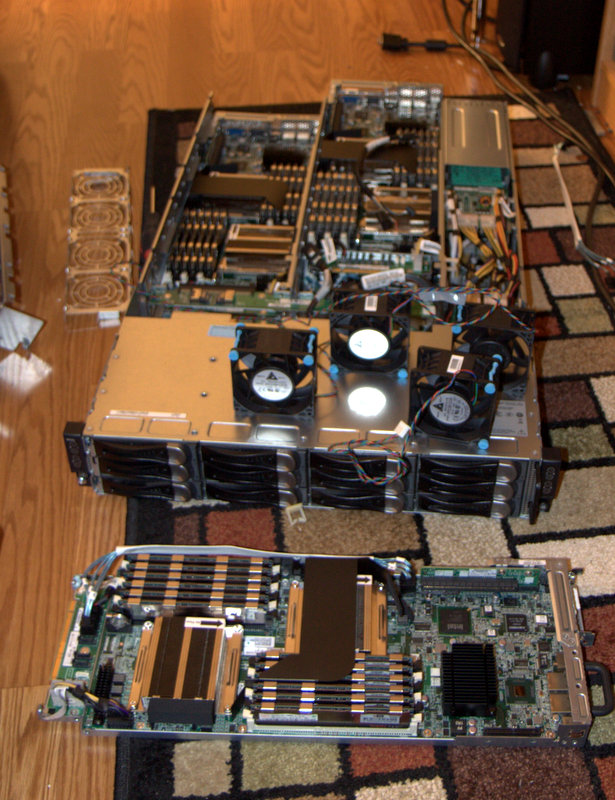
A work in progress
Unfortunately Dell insisted on using a somewhat unique connector for the SAS Sideband (SFF-8485). This is apparently not critical to the function of the SATA ports however they’re a must-have if you like having controller-managed activity and failure lights.

SAS Breakout Cable – Sideband connector circled
Now is the appropriate time to say that I’m rather impressed with the way these servers are laid out, with the exception of how the drives are connected. Observe:

Idiotic SAS connectivity. Yes, I do my markup in mspaint.
In the top bubble you see the backplane which has standard SATA connectors and discrete SGPIO connectors for each bank of 3 drives. These are connected to minisas connectors (requiring a fancy cable) on the “mid-backplane” that the boards plug into. Then, on the front of each board (see the 3rd bubble down) there are SATA connectors that break out these minisas signals into discrete SATA and SGPIO connectors which then get run down to the bottom of the board and connected to the onboard SATA controller (last bubble).
To recap: sata->minisas->sata->sata.
Okay, that isn’t too bad. But what if I want to add a discrete RAID controller such as the LSI Logic 9260-8i (utilizing the PCIe slot on the bottom right) or the Mezzanine controller (using the proprietary connector on the bottom left) that Dell will sell these configured with? These will come with minisas connectors (the Mezzanine controller will have one minisas and two SATA).
Now we have: Sata -> minisas -> sata -> minisas. Oh, and we also have to keep track of the SGPIOs for each one of the four banks of drives. How convenient.
I wish Dell had simply used minisas connectors for the whole system – the 36 pin connector takes care of SGPIOs without any need for special cables, plus they are something I can go out and buy without having to resort to trying to find part numbers and hitting up ebay.
As luck has it the existing cables connecting the backplane to the “mid-backplane” are also just a hair too short to move to the top two units so about $100 later I have 6 replacement cables on the way. What fun.
June 6th, 2013 at 5:02 pm
Where did you find the cables? Some of them (eg HJ6F0) are rare/expensive on the open market, and while I’m sure you can order them from Dell for less, it’s hard without the numeric SKU…
July 26th, 2013 at 7:34 am
Any chance you can run us through exactly the order you put those cables in during installation and what you were replacing? The pictures don’t help much =\
September 11th, 2013 at 6:49 pm
You both got caught by the spam filter, sorry about that.
Graham: I ordered the cables off ebay.
Victor: I’m not really able to take a better picture at this point but essentially I connected drives 1-1 through 2-3 to node 2, the rest are connected to node 4.
To accomplish this without losing tray hot-swapability I connected all the drives directly to the lower backplane (4x drives on the first connector, 2x to the second) and then connected the MegaRAID controller on each node to the SATA connectors on the tray.
Unfortunately even with the correct cables the front LEDs don’t seem to work correctly for half the drives (the last 3 connected to each node). I didn’t spend much time debugging this and concluded that it would have been cheaper to just purchase standard cables.
September 23rd, 2013 at 12:03 pm
How did you ultimately end up cabling this?
I’d like to do the same thing to make drives 1-1 through 2-3 appear on a node (1 or 2, doesn’t matter to me) to be storage behind a FreeNAS installation with ESXi running on the remaining nodes (I have four).
I’ve got the 6J3R2 cable and Mezz controller installed. Seems like I need to either redirect the existing sas from one node to the open port on the backplane of my active node or use a 2 SATA breakout cable and run five drives leaving the sixth as a boot drive for the fourth node.